To make a long and complicated story short, a bad guy who exploits this vulnerability places a malicious DLL into your browser’s Downloads folder, then waits. When you run an installer built by an earlier version of NSIS from that folder, the elevation prompt (assuming it runs at admin) shows the legitimate installer’s signature asking you for permission to run the installer. After you grant permission, the victim installer loads the malicious DLL which runs its malicious code with the installer’s permissions. And then it’s not your computer anymore.
So, how does the attacker get the malicious DLL into the browser’s Downloads folder? Surely that must involve some crazy hacking or social engineering, right?
Nah. The bad guy just navigates a frame of your browser to the DLL of his choice and, if you’re on Chrome orMicrosoft Edge Legacy, the DLL is dropped in the Downloads folder without even asking. Oops.
It’s trivial to simulate this attack to find vulnerable installers, even as a total noob.
1. Simply click this link which downloads a fake DLL (a simple text file containing the string ThisIsNotADLL).
2.Then download and run an installer built by an old version of NSIS:
3. Accept the elevation prompt:
4. Boom… watch Windows try to load your fake DLL as code:
Of course, a real bad guy isn’t going to be nice enough to use a fake DLL, he’ll instead use a valid but malicious one containing code that runs during DLL load, silently rooting your computer or whatever other nefarious thing he’d like.
Around 80% of the installers in my \Downloads\ folder are vulnerable to this attack; half of those are built on NSIS and half are built using other technologies.
You can learn more about this attack in this 2012 post.
EXE Hijacking
I’ve found some otherwise-safe installers will perform unqualified calls to system utilities (e.g. to manipulate the firewall or registry, etc). If a bad guy plants an executable of the target name (e.g. “netsh.exe”) in the \Downloads\ folder, it could be executed without warning, much like the DLL hijacking attack.
Action Items
Here are my suggestions:
If you build installers with NSIS, please upgrade immediately.
If you build installers with other technology, test for this attack (version.dll, msi.dll, shfolder.dll, etc). This post suggests a more complete way of finding target filenames. Another post notes that InnoSetup is vulnerable.
As a consequence, when I was approached to write a book about Internet Explorer in 2009, I turned it down. “No one reads books anymore,” I asserted to the Vice President of the Internet Explorer team. At the time, I was sitting about 6 feet from my bookshelf full of technical books that I’d been buying over the last decade, including a few I’d purchased in the last month.
My counter-factual stance continued for the next few years, even as I served as a technical reviewer for five books on web development and performance. Then, in 2011, as I started pondering the sale of Fiddler, I met some product managers at the proposed acquirer and watched them use Fiddler for a few minutes. I was appalled—these guys had been looking at Fiddler for six months, and seemed to have settled on the most cumbersome and complicated ways to get anything accomplished. It wasn’t really their fault—Fiddler was incredibly feature rich, and I couldn’t fault them for not reading the manual—there wasn’t one. I felt a moral obligation, whether I sold Fiddler or not, to at least write down how to use it.
At the time, my wife was training to run marathons and I had quite a bit of free time in the mornings. Not knowing any better, I did what I assumed most writers do—I took my laptop to the coffee shop in the mornings and started writing. My resolve was aided by two crutches—
I was happy to describe Fiddler, feature-by-feature, from top to bottom, left to right (Hemmingway, this wasn’t), and
I decided that even if I abandoned the project without finishing a proper book, I could just save the results to a PDF, title it “Fiddler-Manual.pdf” and upload it to the Fiddler website.
I’ll cover the mechanics of actual writing in a future post (surprisingly straightforward, but I have some advice that may save you some time), but for now it suffices to say that after nine months of work a few times a week, I had a book.
My Investment
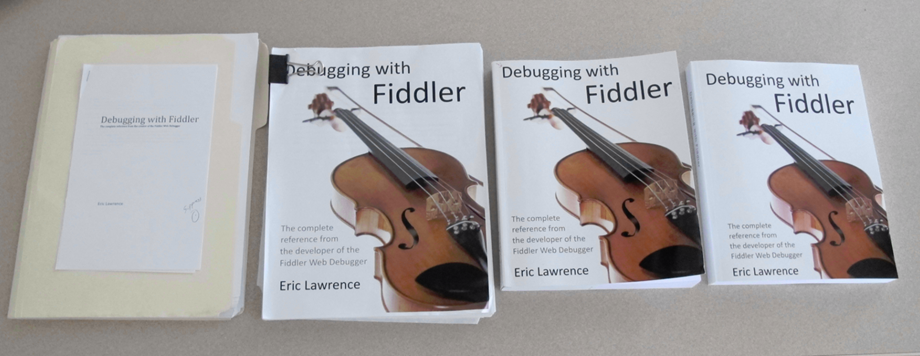
Writing the first edition took about 110 hours authoring, 20 hours of editing, and 30 hours of designing the cover, fixing formatting, and futzing with the printer/publisher webapp. I spent about $50 on draft copies, $40 or so on the cover photo, $20 on the fiddlerbook.com domain name registration, and about $650 for coffee and pastries consumed while writing. From September 2011 to June 2012, I periodically took a “snapshot” of my progress by printing the work:
Writing took about three months longer than my prediction:
… in part because as I wrote, I discovered what I’ve come to call Book-Driven Development (covered in the next section).
I was proud of the final product, but skeptical that it would earn back even what I spent on coffee.
So, Why Write?
First, it’s something parents and other folks can tangibly hold and appreciate. It’s probably the only way my grandmother will ever have any idea what the heck a “Fiddler Web Debugger” is and why someone might use one.
Second, it’s tangible. Many people have contributed to Fiddler over the years, and I can inscribe a paperback copy and send it to them as a “Thank you.” When the book was finished, I bought a dozen copies and dropped them off in the offices of colleagues who’d made contributions (in the form of bug reports or suggestions) over the years. One of the proudest moments of my life was when I got an email from Mark Russinovich thanking me for the signed copy and noting that it would nicely complement the ebook he’d already bought.
Third, writing a book makes you think very very hard about what you’re writing about, and with a different mindset. The Fiddler book took quite a bit longer to write because I made hundreds of improvements to Fiddler while I was writing the book, because I was writing the book. Almost every time I thought of something interesting to explain, I began to write about it, then realized that whatever it was shouldn’t have been so complicated in the first place. I’d then go fix Fiddler itself to avoid the problem. In other cases, explicitly writing out everything you can do with Fiddler made me recognize some important (and in hindsight, obvious) gaps, and go implement those features. I started calling this process Book-Driven Development and Fiddler was dramatically improved over the authoring of the book. Having said that, this also made writing the book take quite a bit longer—I’d write three or four pages, realize that the feature in question shouldn’t be so complicated, and go implement a checkbox or a button that would do everything the user needed without explanation. Then I’d have to go delete those three or four pages and replace it with “To do <X>, just push the <X> button.”
Fourth, I got to choose what to write about. Fiddler is insanely powerful, but after watching people “in the field” use it, it was plain that most of its functionality is completely unknown to the vast majority of users. While some users watch the videos and read the blog posts, it was clear that there are some number of folks for which a complete book with an end-to-end explanation of the tool is the best way to learn it.
Fifth, it gives you an appreciation for other authors that you may never get otherwise. Marathon runners probably have more respect for other marathon runners than the general public ever will, simply because they know how grueling it is to run 26.2 in a way that someone who hasn’t never will. I think the same is probably true for book-writers.
So, in summary:
It’s tangible.
You can gift it to contributors.
You’re forced to think like a new user.
You can drive the direction of usage.
You learn to appreciate authors.
Self-publishing significantly changes your book’s financial prospects.
Money Matters
One of the challenges with almost any profit-making endeavor is that folks are so coy about the numbers involved. Inspired by John Resig’s post on Programming Book profits, I’m going to share my numbers here. My goal isn’t to brag—I think these are solid numbers, not runaway success numbers, but I want to show why “You’ll never make any money selling a book” is simply untrue.
Having read a bunch of posts like Jeff Atwood’s and Resig’s, I realized that going the traditional publisher route was a bad deal for both the reader and for me– the Fiddler book would have been ~$30 and I’d see maybe two or three dollars of that. Self-publishing is a better deal for the reader (lower prices) and it’s a better deal for me (I get about $6 and $8 respectively). While a traditional publisher would have probably netted me an advance of a few thousand bucks (more than I expected to make) I frankly prefer the “honesty” of being solely responsible for my book’s sales, and the often happy feeling I get when I (obsessively?) check sales stats and find that I sold a handful more copies overnight.
The first edition of Debugging with Fiddlerwas released in June 2012. The book was self-published on Lulu for the ebook (a PDF) and via CreateSpace (paperback) which was mostly sold on Amazon. The Lulu ebook was sold for a flat $10, while Amazon set the price for the paperback, usually at a small discount off the nominal $18.99 cover price.
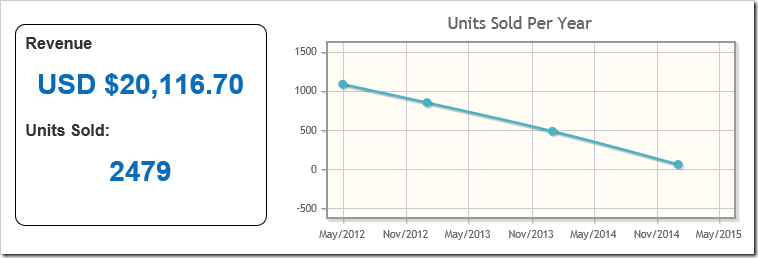
Here are the sales figures for the ebook on Lulu:
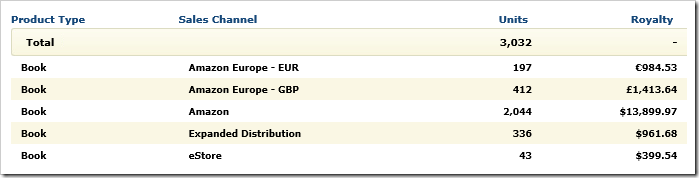
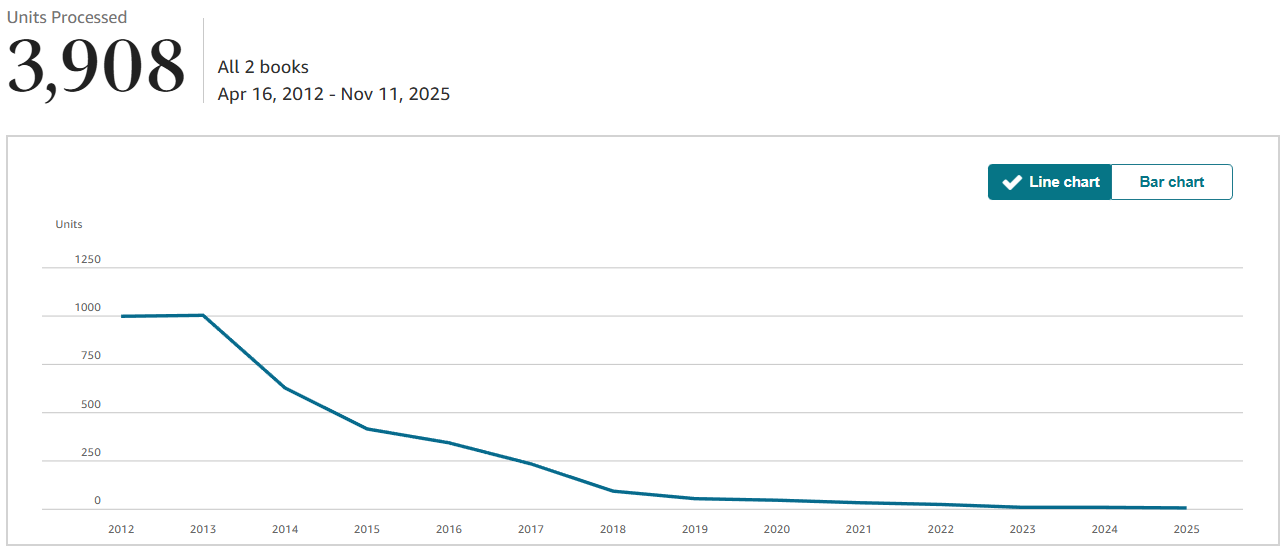
The paperback sold slightly better, with 2713 English copies sold; the CreateSpace report below includes the 319 copies sold (so far) of the Second Edition:
Beyond the sales of my book, I also agreed to let the book be translated to Korean, Chinese, and Japanese by three local publishers. Each publisher agreed to an advance of about $1500, as well as three or four copies of the translated paperback. Of these, only one publisher (O’Reilly Japan) sends follow-up royalty statements; the book sold approximately 1400 copies in Japanese, and their advance was followed by a royalty check of $1450 in February of 2014.
On March 5th of 2015, I released the Second Edition update, revised to describe the changes in Fiddler over the last three years. This too proved far more successful than I’d ever dreamed. The $14.99 PDF (usually “on sale” for $9.99) took the lion’s share of sales with 840 copies sold, vs. 319 copies of the revised paperback. While the paperback stayed at CreateSpace, I moved to GumRoad for the new ebook for reasons I’ll describe in a future post.
So, how much did I earn? A bit more than $53318 or so thus far– the Euro/GBP exchange rates make the math a bit tricky. I spent about 200 hours of solid work on the First and Second Editions, so this works out to a bit over $250 per hour. Pretty amazing, for a project that yielded so many non-financial rewards!
Results Will Vary
It’s worth mentioning that my sales numbers are almost certainly much higher than they would’ve been “naturally”, but for one critical factor— as the developer of Fiddler, I was in a position to advertise the book both on the Fiddler website and in the Fiddler application itself. Exposed to millions of Fiddler users, this exposure was obviously invaluable and not, alas, something available to most writers.
It’s also the case that as the tool’s author, I benefit from credibility and name recognition (people expect that I’ll know what I’m writing about). As the primary source, I also have the luxury of writing more quickly since I didn’t need to do much research (subject to the “Book driven development” caveats earlier).
My (long overdue) next book project, Blue Badge, is a memoir of my time working at Microsoft, and it won’t benefit from the incredible exposure I had for Debugging with Fiddler. I’m intrigued to see how it sells.
If you’re an aspiring author, or simply interested in book publishing, I hope you found this post useful!
Fiddler’s default file format is the SAZ Format, which is just a ZIP file with a particular structure (I’ve written a lot about ZIPs). Unfortunately, sometimes users’ SAZ files get corrupted due to failing disks or incomplete downloads, and when this happens, Fiddler can no longer open them.
Because Fiddler uses a standard ZIP file, surely a good ZIP reader will be able to read some data, right?
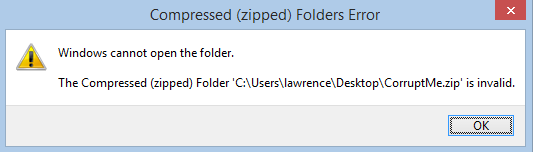
Windows Explorer’s primitive ZIP implementation can’t do anything useful:
Alas, not even 7-zip offers any help.
Okay, well, surely you can just use any of the many ZIP Repair tools to extract the data that isn’t corrupt from the file, right?
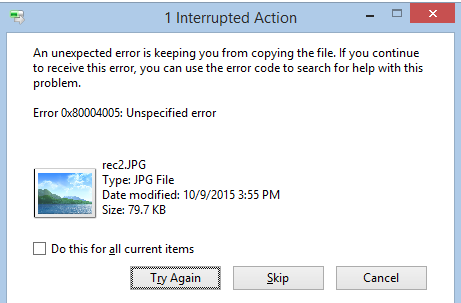
Alas, a few hour’s worth of research suggests that almost all of the public ZIP repair tools are terrible, unable to handle most forms of corruption. Some claim to work, but the resulting “repaired” archive remains unreadable:
Those tools that seem promising aren’t free, and require spending $30 or so before you can even determine whether they’ll get your data back.
What to do?
Write my own, of course. Most SAZ files are internally quite simple, and it shouldn’t be too hard to recover most data from archives that aren’t encrypted.
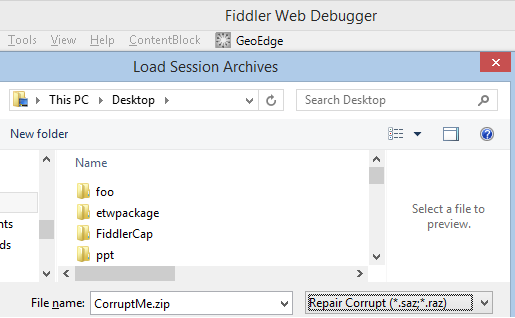
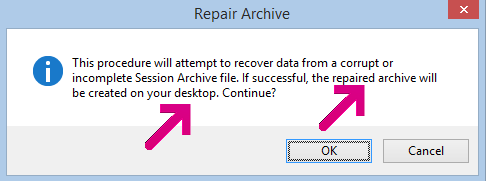
Fiddler 4.6.2 will offer a Repair Corrupt option on the dropdown in the Load dialog box:
When you choose this option, Fiddler will enter its archive recovery mode:
Notably, the recovery mode doesn’t especially care whether the recovered ZIP file is a SAZ file. If not, Fiddler will alert you that the file couldn’t be interpreted as a SAZ:
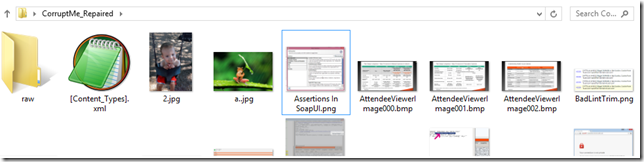
… but the repaired file on your desktop:
… should now be openable by your ZIP reader of choice:
I hope you find this new capability useful, both for Fiddler-generated files as well as any other corrupt ZIP or ZIP-based (e.g. docx, pptx) files you may encounter.
I’ve written a few articles about using Authenticode to sign your code to help prevent attacks, increase user confidence, and reduce interference from security software like Windows SmartScreen. You can read the overview, discussion of code-signing tokens, and “tricks” you can use to shoot yourself in the foot by adding data to a file without breaking its signature.
At the end of the last post, I mentioned that you shouldn’t be using signatures based on the MD5-hash, as that hash algorithm is outdated and collision attacks are getting better and cheaper with each passing day. Bizarrely, Microsoft hasn’t yet disabled MD5 for Authenticode (even as they increasingly talk about the threats to SHA1-hashed certificates). As far as I can tell, Microsoft hasn’t even announced a plan or timetable to do so.
The problem is that any signature based on MD5 could be simply copied from an MD5-signed file and then applied to any file whose MD5 hash was made to collide with the original—the result would be that the new file would appear to be signed by the certificate that had signed the original file. Back in 2014, the installer for CoPilot was signed with MD5 and was vulnerable to this attack.
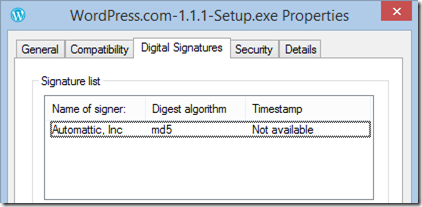
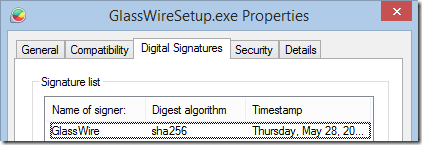
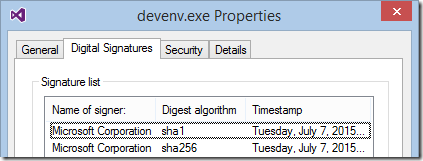
Earlier this month, Automattic announced a new WordPress Desktop client which suffered from the same problem. You can examine the hash (digest) algorithm by right-clicking a signed file in Windows Explorer and choosing Properties from the context menu. The Digital Signatures tab will show information about the signed hash(es) used:
After investigating with the Automattic engineering team, we determined that the problem was due to the same root cause—signcode.exe defaults to MD5 and both the Windows and Mono version of this ancient tool default to the insecure MD5 hash.
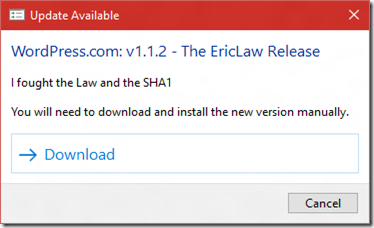
The Automattic folks quickly fixed the problem (by simply adding -a SHA1 to the tool’s command line arguments) and pushed a new build. They were kind enough to name the release after me, with a funny release note:
Hashes, Hashes, and Hashes
When it comes to Authenticode, up to four different signed hashes are used:
The contents of the signed file
The contents of each of the certificates in the file’s signing certificate chain
The contents of the signing timestamp
The contents of each of the certificates in the timestamp’s signing certificate chain
The first hash is what this post has talked about thus far, but the second is arguably more interesting. If a certificate has a weak signature, an attacker could copy its weak signature to a maliciously crafted certificate and then he could sign an unlimited number of malicious files, making it appear as if they had been signed by the victim organization.
As a consequence of this greater threat, Microsoft has been gradually ramping up the restrictions on the hashes used in the signing chain: In 2016, certificate chains containing SHA1 will be blocked for files originating from the Internet. Code-signing certificate chains should be using the much stronger SHA256 hash.
You may be wondering whether you should be also using SHA256 to hash the contents of the file:
SHA256 file digests are supported on the latest versions of Windows, but not on Windows XP, even with Service Pack 3 which supports SHA256-hashed certificates. Fortunately, if you need to support older versions of Windows, you can dual-sign the file by applying multiple signatures:
To dual-sign with SHA256, you must use the signtool.exe rather than signcode.exe; the /as argument is used to append additional signatures, and /fd sha256 is used to specify a SHA256 digest. You also need to ensure that your SHA256 signature’s timestamp uses a modern timestamping URL.
I was excited to start dual-signing my tools with SHA1 and SHA256, but I’ve hit a stumbling block; the eToken Pro signing token I use only supports MD5 and SHA1, but not SHA256. I’ll need to replace the token with a more modern version to use SHA256. Update: I ordered a YubiKey4 and wrote about using SHA256 with YubiKey.
When a browser needs to send a HTTPS request through a proxy (like Fiddler), there’s a bit of a problem.
The proxy needs to know where to send the client’s request, but the whole point of protecting traffic with HTTPS is that the content is encrypted and cannot be read by anyone else on the network, including the proxy!
To resolve this Catch-22, a trick is used– the browser sends a HTTP request with the method CONNECT and the target hostname and port to which the client would like a connection:
Upon receiving such a request, the proxy is expected to establish a TCP/IP connection to the requested hostname and port and signal its success by returning a HTTP/200 response indicating that the requested connection was made:
HTTP/1.1 200 Connection Established Connection: close
Subsequently, the proxy is expected to just blindly shuffle all bytes back and forth between the client and the server connections without looking at them. The client and server perform their HTTPS handshakes and then exchange encrypted traffic (typically, one or more HTTPS requests and responses). When the connection is no longer needed, either side closes the connection and the proxy, upon receiving notice that one side has closed the connection, closes the other side of the connection too.
We often refer to connections established in this way Proxy Tunnels.
In Fiddler, tunnels are represented by a grey lock icon with the text “Tunnel to” in place of the Host field; the URL field shows the target hostname and port, as seen in the first line of the screenshot:
Notably, Fiddler isn’t limited to blind proxy tunnels, it can execute a man-in-the-middle against both sides of the connection, pretending to the client that it is the server and pretending to the server that it is the client. When you enable HTTPS decryption in Fiddler, the proxy tunnel in the Web Sessions list is followed by all of the requests and responses that were transferred through that tunnel (as shown in the second and third lines in the screenshot).










 text/plain