Disclaimer: Hi. I’m an engineer on the Edge browser now, but worked on Chrome Security for a bit over two years. I speak for no one but myself, and I share no internal or confidential information in this post.
Update: The Chrome team announced upcoming changes based on user-feedback.
This weekend, there were a bunch of breathless articles and blogs about a very small change recently made to Chrome. Some of the claims are correct and carefully thought out, but in the swirl of clickbait and confusion, there are a bunch of inaccurate claims as well.
What Changed?
No, Chrome doesn’t “upload your browser history when you check GMail”… unless you tell it to do so.
Yes, Chrome has streamlined the opt-in to the browser’s “Sync” features, such that you no longer need to individually type your username and password when enabling Sync. Whether you consider this “Convenient!” or “Terrible!” is a matter of perception and threat model.
Screenshots
Because many people haven’t seen this change yet, here are some screenshots from Chrome 71.3558.
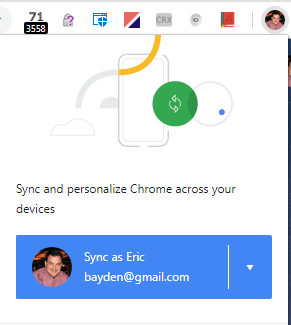
When you sign into a Google site or service in the browser’s HTML content area, your avatar/profile picture will now appear in the browser UI. If you click on your avatar, a flyout appears offering to enable sync:
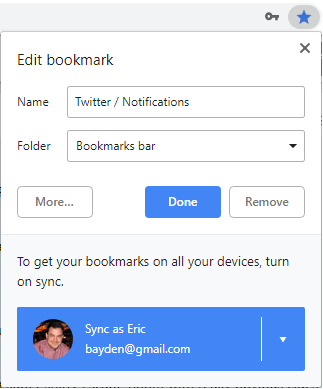
Similarly, if you use certain browser features that are more valuable with Sync (e.g. creating a bookmark or storing a password), the UI offers to turn on Sync:

(Concern: This “Sync as Eric” button appears in the same X,Y location as the “Save Password” button on the preceding flyout/bubble, so you could conceivably click it by accident.)
If you click on one of these options to turn on Sync, a giant flyout appears to tell you what this means:
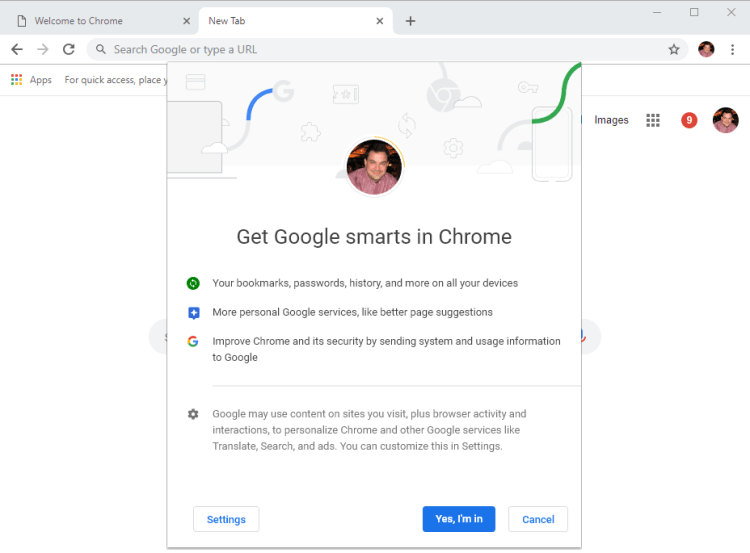
Interestingly/Concerningly, if you click “Settings”, it’s interpreted as “Yes, and show Settings“:
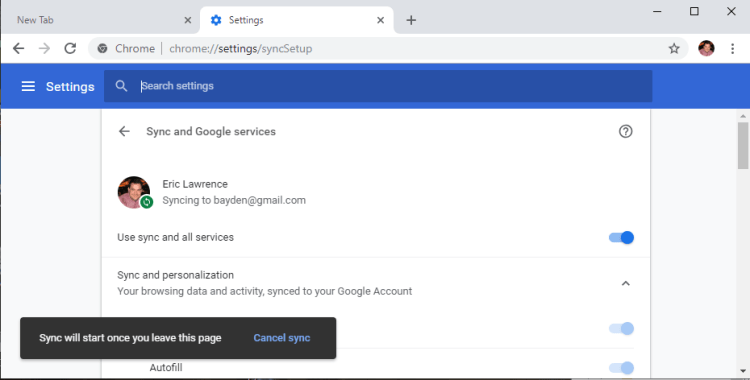
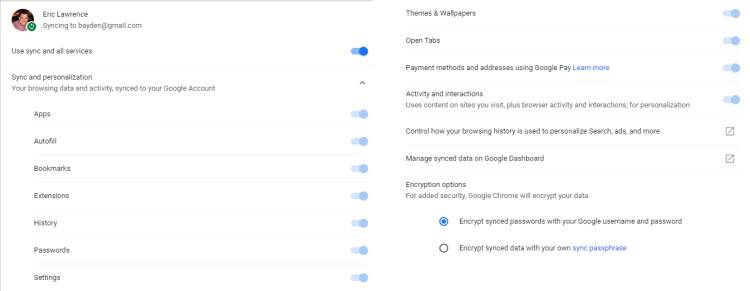
If you look through the Sync settings (also available by visiting chrome://settings/?search=sync), you’ll get a rich list of controls for what you can choose to sync:
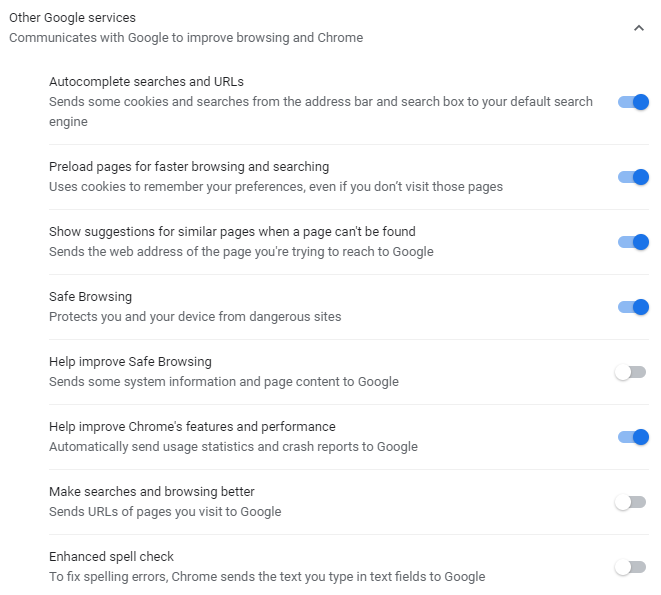
Below that list, you can also find a list of all of the other ways (independent of Sync/Signin) that Chrome can talk back to Google:
Change Your Mind? Disable Sync
If you change your mind after enabling Sync, or enabled it by accident, it’s easy to change. Click your Avatar and click on the “Syncing to” badge. Then click Turn off. Decide whether or not you want to keep local copies of the data that was sync’d to the server:
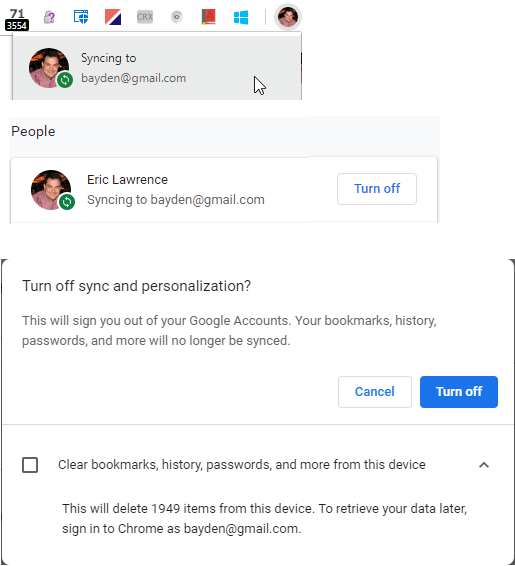
Note: If you accidentally signed into Chrome and enabled Sync on a device you borrowed from someone else, it’s very important that you check the box to clear local data when you’re done with it, or your information will be left behind on the device.
Fun Stuff for Nerds
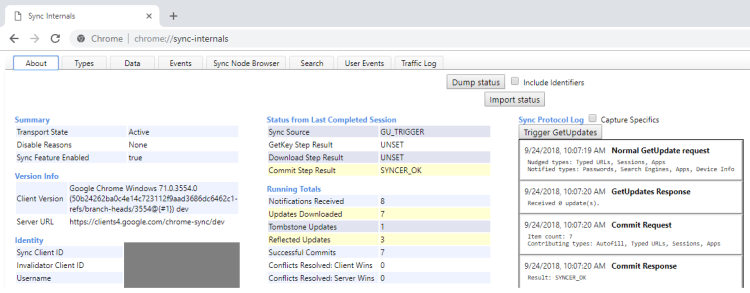
If you’re a geek and are interested to better understand how Sync Works, visit the URL chrome://sync-internals/ in Chrome. You can see events in the Sync process and tons of data about what exactly is syncing.
Opt-Out
If you don’t want Chrome to Sync, just don’t click buttons that offer to enable it.
Arguably, enabling Sync is now so streamlined that you could conceivably do it by accident (or someone borrowing your PC could do it for you).
If you’re concerned about sign-in to Chrome and want to ensure that you don’t ever activate Sync by accident, you can set a Policy inside HKEY_LOCAL_MACHINE\SOFTWARE\Policies\Google\Chrome:
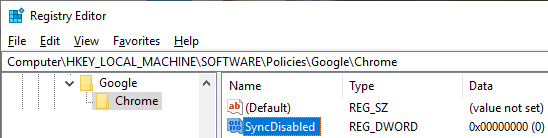
You can set the Windows policy by simply importing this registry script.
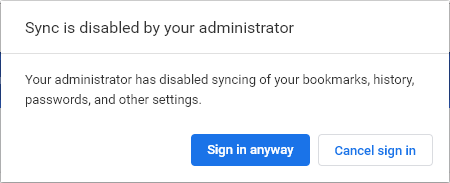
After Sync is disabled, buttons asking to turn on Sync disappear, and (interestingly) if you try to sign into Chrome, a warning notice appears:
Motivations
Many of the articles that came out this weekend were rife with speculation that this is some new attempt from Google to erode your privacy by vacuuming up even more of your browsing data.
I don’t work for Google and I have no insider knowledge, but I think such attributions are incorrect. I think the correct explanations are much more mundane:
- The old UX was just really weird for humans. “Wait, you computer nerds are telling me that I just signed into Google using Google Chrome in the browser content area and now you’re telling me that I need to sign into the Google Chrome Browser using the browser chrome. WTF?!?”
- The old UX was dangerously misleading for people who share computers, a worryingly common practice.The new UX makes it at least a bit more clear that if you’re browsing on a borrowed computer, you really should be using a discardable Guest profile.(I think Guest Profiles are one of the coolest little-used features in Chrome).
- The new UX streamlines the enabling of Chrome Sync. Chrome Sync provides advantages to both the user and Google.
The Advantage to the User is that their satisfaction with the browser is higher. On average, satisfaction increases when Sync is on because the browser can do more for the user, better protecting them from phishing sites (via the password manager) and sharing their bookmarks, permission settings, etc on every device they use. Users with many devices (me) are especially excited about this benefit– I have enough to remember and configure, and I want my browser to help as much as it can.
The Obvious Advantage to Google is that users who are more satisfied with Chrome are more likely to use Chrome and not switch to some other browser. Chrome is simply stickier because switching to a browser that doesn’t have access to all of the user’s stored passwords, bookmarks, settings, etc, is less appealing.
In a world where browsers are shells around commoditized HTML parsers and script engines (E.g. compare Brave vs. Chrome), sticky features like sync are critical to marketshare. Consider, for instance, Chrome on iOS. It runs atop Apple’s WkWebView and is by-(Apple’s)-design intrinsically inferior in almost every way to the native Safari. Except for one thing… Chrome has my settings and data and Safari doesn’t. So I’ll go out of my way to get Chrome on iOS because, to me, Sync is critical time-saver that Safari can never match, because Safari doesn’t run on Windows and Chrome does. iOS represents a potentially addressable browser market of around a billion devices.
The Possible Unobvious Advantages to Google are what worry the skeptics and fearmongers– what if Google uses my data for something evil? Evil might range from a little evil (showing me ads for Beanie Babies because it sees I’m browsing a lot of Beanie Baby sites) to a lot evil (giving my data to “the Government” or my insurance company or my boss or some other bad person). Similarly, they could start using it recklessly (having my Google Home ask in front of my dinner guests “Hey, Eric, want to continue your search for the best Beanie Baby sales?“).
I personally don’t have significant concerns on this front (I got to see how seriously privacy is taken inside of Google and Chrome), but some people do.
My threat model is not your threat model.
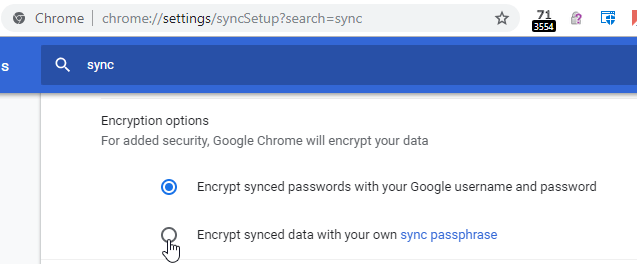
If Evil Google is in your threat model, you can set an option to encrypt your sync data such that only your local Chrome instances can see it:
If Extra Evil Google is in your threat model, you shouldn’t be using Chrome at all, because obviously Extra Evil Google could just backdoor Chrome before encryption or after decryption.
-Eric
PS: A helpful thread from a Chrome area owner.
Update: The Chrome team announced upcoming changes based on user-feedback.