Recently, many Microsoft employees taking training courses have reported problems accessing documents linked to in those courses in Chrome and Edge.
In Edge, the screen looks like this:
But the problem isn’t limited to Microsoft’s internal training platform, and can be easily reproduced in Chrome:
What’s going on?
There are a number of root causes for an ERR_BLOCKED_BY_CLIENT message, and the most common root cause is that you’ve installed a content-blocking extension (e.g. an ad-blocker) and it directed the browser to block the page.
But that’s not what’s happening here — we saw this on machines without any content blocking extensions.
What’s happening here is that the PDF viewer is blocked from loading because the new tab was created as a popup under the restrictions of the HTML5 Sandbox. The sandbox rules applied to the new tab include prohibitions on script and extensions, and Chromium’s PDF viewer requires both. So, the user ends up with a totally inexplicable blocking page.
Refreshing the page will not fix it, and shockingly, even navigating the tab to a different, non-PDF URL, will still likely result in failures (either script won’t run, or the page will not load) because the sandboxing limits are not removed upon manual navigation. For instance, Twitter refuses to load:
Twitter shows ERR_BLOCKED_BY_RESPONSE due to its use of Cross-Origin-Opener-Policy
As an end-user, the workaround is easy: Copy/paste the URL from the broken tab to a new one and your document will load just fine.
As a web developer, to avoid creating unexpectedly impaired tabs, you must set the allow-popups-to-escape-sandbox flag; when you do so, new windows will not be restricted.
A quick look showed that our company training app specifies this flag, but the new tab was still impaired.
What gives?
A deeper look showed that the training app contains nested sandboxes — while an inner iframe includes the allow token, that iframe’s parent does not have the token.
The grandparent’s restriction on its child also restricts its grandchild:
Perhaps the Chromium dev tools should warn if a child iframe‘s sandbox directive specifies permissions that that will be denied by the grandparent’s restrictions on the parent?
Over twenty years ago, the Opera browser got me hooked on mouse gestures, a way for you to perform common browser actions quickly. After I joined the IE team in 2004, I fell in love with a browser extension written by Ralph Hare and I later blogged about it on the IEBlog and helped Ralph get it running in 64bit IE.
Many years passed. By 2015, I had abandoned the outdated IE and moved to Chrome fulltime. When I joined the Chrome team in 2016, I was heartened to note that mouse gestures were one of the very few features slated for inclusion in the first version of Chrome. They were repeatedly postponed and eventually cut, with the idea that perhaps a browser extension was the way to go. I installed the most popular Mouse Gestures extension from the Chrome web store only to later discover that it was sending my browser traffic to a questionable server in China. I uninstalled it and reported it to the Chrome Web Store folks who delisted it. Apparently a while later they slightly reduced the data leakage and got it back up on the Web Store, and in 2019 a new hire PM lead on the Edge team suggested we all install it. I took a look at what it was doing and found that it was still engaged in questionable privacy practices. Bummer.
Fast forward to earlier this year, when I discovered that the Edge team has landed gestures in Edge on Windows! I was excited to see the implementation, and feel like it’s one of several features that makes Edge feel like it’s a batteries-included browser. (Unfortunately, this feature presently seems to be Windows-only. If you’re using a Mac or Linux, you should click the menu … >Help and Feedback > Send Feedback to ask for it.)
Dozens (hundreds?) of times a day, I enjoy the satisfaction of closing browser tabs by right-click-drawing a “L” on them.
To enable Mouse Gestures support in Edge, simply visit edge://flags/#edge-mouse-gesture and enable the feature:
After you restart the browser you can go visit the edge://settings/mouseGesture page to configure them:
Don’t worry about memorizing a ton of shortcuts — I really only use two: back (right-click+left-drag) and close tab (right-click+DrawL).
I smile every time this works, and every time I test something in Chrome I lament their absence.
-Eric
PS: Besides support for Mac OS, one other missing feature I’d love to see is the ability to bind a gesture to an extension or JavaScript-bookmarklet. That would allow me to recreate one of my other IE-era gestures– I could waggle my mouse to run a JavaScript which would remove all ad-like elements from a page.
A fairly common security bug report is of the form: “I can put JavaScript inside a PDF file and it runs!”
For example, open this PDF file with Chrome, and you can see the alert(1) message displayed:
Support for JavaScript within PDFs is by-design and expected by the developers of PDF rendering software, including common browsers like Chrome and Edge. Much like HTML, PDF files are an active content type and may contain JavaScript.
Periodically, less experienced security researchers excitedly file this issue against browsers, and those reports are quickly resolved “By Design.”
Periodically, more experienced security researchers excitedly file this issue against sites and applications that are willing to host or transfer untrusted PDF files, arguing that this represents a “Stored Cross-Site Scripting vulnerability.”
Their confusion here is somewhat more understandable– if a website allows a user to upload a HTML document containing script, and then serves that HTML document from their domain, any script within it will run in the security context of the serving domain. That describes a classic Stored XSS Attack, and it presents a security threat because the embedded script can steal or manipulate cookies (by accessing the document.cookie property), manipulate web platform storage (IndexedDB, localStorage, etc), conduct request forgery attacks from a 1st party origin, etc.
The story for PDF documents is very different.
The Chrome Security FAQ describes the limitation tersely, noting the set of bindings provided to the PDF are more limited than those provided by the DOM to HTML documents, nor do PDFs get any ambient authority based upon the domain from which they are served.
What does that mean? It means that, while PDF’s JavaScript does run, the universe the script runs in is limited: there’s no access to cookies or storage, very limited ability to make requests (e.g. you can navigate the document’s window elsewhere after a user gesture, but that’s about it), and no ability to make use of the Web Platform’s powerful capabilities exposed by the HTML Document Object Model (DOM) objects like document, window, navigator, et cetera. While the capabilities of JavaScript in PDF are extremely limited, they’re not non-existent, and PDF engine software must take care to avoid introducing new capabilities that void the safety assumptions of PDF-handling code.
Restricting JavaScript in PDF
Engineers should take care that handling of JavaScript in PDF respects app/user settings. For example, if the user turns off JavaScript for a site, PDFs hosted on that site shouldn’t allow script either. This works properly in Chrome and Edge.
Firefox’s global javascript.enabled toggle from the about:config page doesn’t impact script inside its PDF viewer:
Instead, Firefox offers an individual pdfjs.enableScripting preference that can be configured from the about:config page.
Chromium currently ignoresContent-Security-Policy headers on PDF responses because it renders PDF files using web technologies that could otherwise be disallowed by the CSP, leading to user confusion and webdev annoyance.
I “ran” the Capitol 10K for a third time on Sunday. It did not go well, but not for any of the reasons I worried about. The rain stopped hours before the race, and the course wasn’t wet. My knees and feet didn’t complain. My heart rate felt pretty much under control. I had found the charger for my running watch and got my headphones charged.
No, like my first race, I got screwed by nutrition. After mile 2, I was feeling heartburn for the first time in months (years?), and I began frequently dropping to a walk while I worried about it. Was it the flavored coffee I had in the morning? My dubious dinner (Subway) or the beer I had with it? In hindsight, the real problem was probably some red wine I’d had the prior afternoon — I don’t drink wine often anymore, and I’m more sensitive to it. Ah well, whatever the cause, you can see the impact.
You can see where things went off the rails. My first half was a non-disastrous 4 minutes slower than last year, but my second half took my 6 minutes longer than the first. The only bright spot was the short uphill “King of the hill” segment, which I completed at a pace of 8:15/mi vs. last year’s 9:32/mi. (Update: I misread this, and actually took much longer on the KQ Hill than last year, but further research strongly suggests that they pick a different length/hill each race).
I spent miles 3 to 5 mostly walking through the neighborhoods that I’d joyfully sped through last year, watching my fellow “A” group people blow by, wondering if I was ever going to be able to run a half marathon again after this puny 10k was killing me.
By mile 5, I was starting to feel somewhat better but I still held off on picking up the pace, recognizing that this was not going to be my day. Unlike last year, I didn’t hear my (phantom) children cheering as I turned the final corner after the bridge and sped up for the finish line.
I finished in 1:06:15, a pokey 10:40/mi pace, 14 minutes slower than last year, 8.5 minutes slower than my fall Daisy Dash, and just 83 seconds faster than my first Cap10K. Not a great result.
I’ve signed up for the Sunshine 10K next month to hopefully find myself back on track, and also got the early-bird discount for signing up for the 2025 Cap10K.
Better luck prep next time?
-Eric
PS: Bonus pic from yesterday’s (cloudy) total eclipse in Austin.
A few years back, I wrote a short explainer about User Gestures, a web platform concept whereby certain sensitive operations (e.g. opening a popup window) will first attempt to confirm whether the user intentionally requested the action.
As noted in that post, gestures are a weak primitive — while checking whether the user clicked or tapped a key is simple, gestures poorly suit the design ideal of signaling an unambiguous user request.
Hijacking Gestures
A recent blog post by security researcher Paulos Yibelo clearly explains a class of attack whereby a user is enticed to hold down a key (say, Enter) and that gesture is treated as both an acceptance of a popup window and results in activating a button on a target victim website. If the button on that website performs a dangerous operation (“Grant access”, “Transfer money“, etc), the victim’s security may be irreversibly compromised.
The author calls the attack a cross window forgery, although I’d refer to it as a gesture-jacking attack, as it’s most similar to the ClickJacking attack vector which came to prominence in 2008. Back then, browsers vendors responded by adding defenses against ClickJacking attacks against subframes, first with IE’s X-Frame-Options response header, and later with the frame-ancestors directive in Content Security Policy. At the time, cross-window ClickJacking was recognized as a threat unmitigated by the new defenses, but it wasn’t deemed an especially compelling attack.
In contrast, the described gesture-jacking attack is more reliable, as it does not rely upon the careful positioning of windows, timing of clicks, and the vagaries of a user’s display settings. Instead, the attacker entices the user to hold down a key, spawns a victim web page, and the keydown is transferred to the victim page. Easy breezy.
Some folks expected that this attack shouldn’t be possible– “browsers have popup-blockers after all!” Unfortunately for their hopes and dreams, the popup blocker isn’t magical. The popup-blocker blocks a popup only if it’s not preceded by a user-gesture. Holding the Enter key is a user-gesture, so the attacker’s page is allowed to spawn a popup window to a victim site.
The Core of the Threat
As with many cool attack techniques, the core of this attack depends upon a built-in web platform behavior. Specifically, when you navigate to a URL containing a fragment:
…the browser will automatically scroll to the first (if any) element with an id matching the fragment’s value, and set focus to it if possible. As a result, keyboard input will be directed to that element.
The Web Platform permits a site that creates a popup to set the fragment on its URL, and also allows it to set the size and position of the popup window.
Web Page Defenses
As noted in Paulos Yibelo’s blog post, a website can help protect itself against unintentional button activations by not adding id attributes to critical buttons, or by randomizing the id value on each page load. Or the page can “redirect” on load to strip off an unexpected URL Fragment.
For Chromium-based browsers, an additional option is available: a document can declare that it doesn’t want the default button-focusing behavior.
The force-load-at-top document policy (added as opt-out for the cool Scroll-to-Text-Fragment feature) allows a website to turn off all types of automatic scrolling (and focusing) from the fragment. In Edge and Chrome, you can compare the difference between a page loaded:
Set force-load-at-top (if appropriate) for your scenario, and/or remove id values from sensitive UI controls (e.g. for browsers that don’t support document policy)
Use frame-ancestors CSP to prevent framing
Auto-focus/make default the safe option (e.g. “Deny”)
Disable sensitive UI elements until:
Your window is sized appropriately (e.g. large enough to see a security question being asked)
An activation cooldown period (~500ms-1sec) to give the user a chance to read the prompt. Restart the cooldown each time a key is held, your window gains focus, or your window moves.
Consider whether an out-of-band confirmation would be possible (e.g. a confirmation prompt shown by the user’s mobile app, or message sent to their email).
Beyond protecting the decision itself, it’s a good idea to allow the user to easily review (and undo) security decisions within their settings, such that if they do make a mistake they might be able to fix it before the damage is done.
Attacks on Browser UI
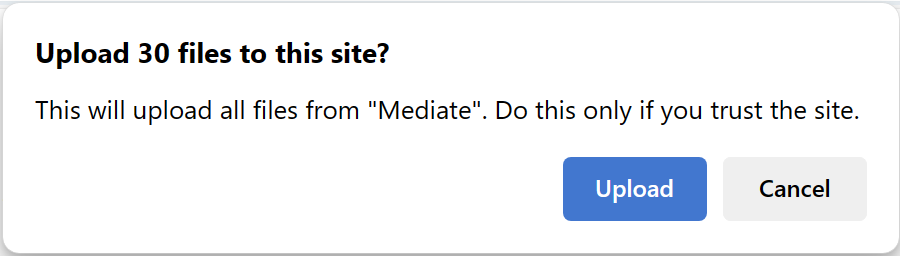
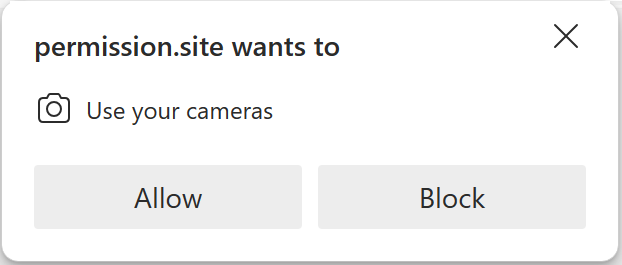
It’s not just websites that ask users to make security decisions or confirm sensitive actions. For instance, consider these browser prompts:
Each of these asks the user to confirm a security-critical or privacy-critical change.
As you might expect, attackers have long used gesture-jacking to abuse browser UI, and browser teams have had to make many updates to prevent the abuse:
Common defenses to protect browser UI have included changing the default button to the safe choice (e.g. “Deny”) and introducing an “input protection” activation timer.