Font Smoothing in Edge

Update, June 2021: See the Microsoft Edge blog post.

Text rendering quality is an amazingly complicated topic, with hardware, settings, fonts, differing rendering engine philosophies, and user preferences all playing key roles. In some cases, however, almost everyone can agree that one rendering is superior to another. Consider, for instance, the text of this Gizmodo article as seen on one user’s computer:

You can use this fancy swipe-view widget to wipe between the renderings of the full paragraph:

Most people think the text for Edge looks awful, with unexpectedly chunky letters and irregular kerning, but the text for IE11 looks pretty good.

Investigation reveals that the problem here is that Edge and Firefox are respecting the system’s font smoothing setting, but IE11 is ignoring it.

Font Smoothing in Windows

Windows has three levels of font smoothing: Off, Basic/Standard, and ClearType. Here’s a quick chart showing the impact of each setting across three browser engines:

Notably, the IE11 rendering is pixel-for-pixel identical regardless of Windows settings– it renders with grayscale subpixel smoothing even when smoothing is off or ClearType is enabled. In contrast, if you zoom into the ClearType examples in Edge 86 and Firefox 80 you can see subpixel smoothing at work, with tiny colored fringes smoothing the edges of the characters.

Examining Smoothing Parameters

Font Smoothing is controlled by four registry values inside HKCU\Control Panel\Desktop. FontSmoothing supports two values {0=Off,2=On} and FontSmoothingType supports values {1=Basic,2=ClearType}. The FontSmoothingGamma parameter controls the darkness of the smoothing and accepts values between 1000 and 2200. You have to zoom in pretty close to see the effect:

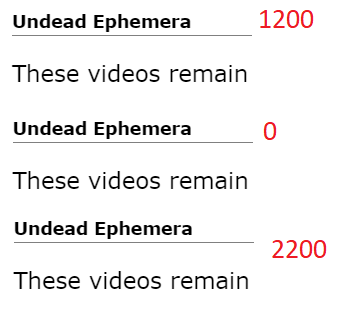
The FontSmoothingOrientation flag controls the order of the red, blue, and green pixels in the display; it supports two values {0=BGR, 1=RGB}; ClearType needs this information to understand which subpixels to illuminate when smoothing. RGB is the most common and the default.

Applications that need this information should use the SystemParametersInfo function to retrieve these parameters.

Tuning Parameters

End-users can enable FontSmoothing in the Windows Performance Options (Win+R, then SystemPropertiesPerformance.exe):


To enable ClearType and tune its settings for your displays and settings, run the ClearType Tuner Wizard (Win+R, then CTTune.exe):

The Tuner will walk you through a series of side-by-side text renderings, asking which of them looks best, a bit like an eye doctor determining the parameters for your prescription eyeglasses.

Note: If you use a Windows PC via a remote desktop connection, ensure that the “Font Smoothing” option is checked in the connection properties:

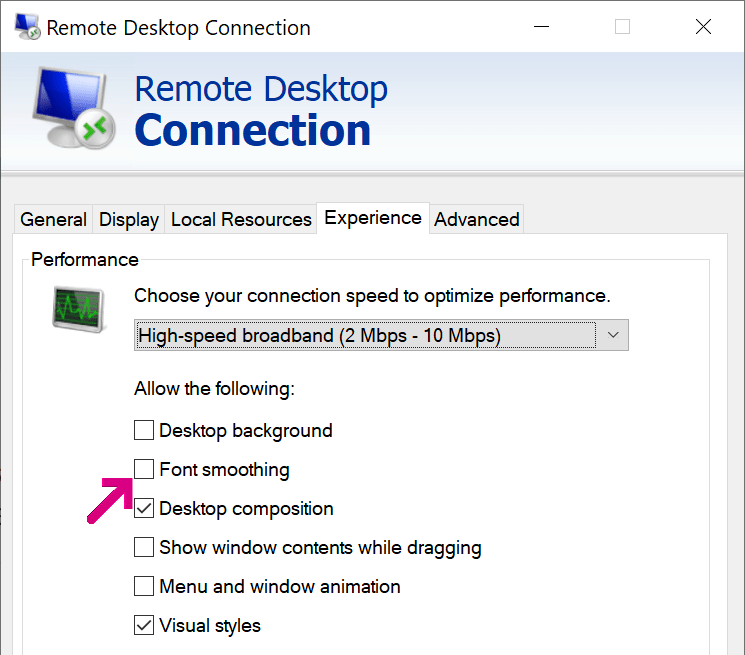
…and that font smoothing wasn’t disabled via policy on the remote server.

Checking Edge Status

You can determine what font smoothing method is presently used in Edge by visiting the URL edge://histograms/Microsoft.Fonts.FontSmoothingMethod

The histogram will show a datapoint for the current state, where

Other Culprits?

Windows settings do not account for all cases of text rendering dissatisfaction.

In some cases, the problem is that a website has selected a font not present on the user’s PC, forcing fallback to an inferior font lacking proper hinting data for smoothing. Within Chromium itself, the browser changes the default fixed width font from Courier New to Consolas if ClearType is enabled, because the latter has better hinting information. Similarly, in Edge 85, we improved font fallback for Chinese to prefer the (ClearType-optimized) Microsoft YaHei and Microsoft JhengHei fonts over legacy fonts.

In other cases, users may simply prefer darker text than ClearType generates, perhaps using a browser extension to achieve their preferences.

In other cases, the user’s hardware might not be optimally configured for font smoothing. For instance, if you run a monitor in Portrait mode, its pixels have a different layout. A device can report its subpixel geometry using a registry key.

If you see a case of poor text rendering across browsers that you cannot explain using the information in this post, please let us know about it!

Update, June 2021: See the Microsoft Edge blog post.

-Eric

Managing Edge via Policy

Last Update: February 9, 2024

The new Microsoft Edge offers a rich set of policies that enable IT administrators to control many aspects of its operation.

You can visit edge://policy/ to see the policies in effect in your current browser:

Clicking on a policy name will take you to the documentation for that policy. The Status column indicates whether the policy is in effect, in Error, or Ignored. A policy is in Error if the policy name is unrecognized or the policy value is malformed.

A policy can be Ignored for several reasons. On reason is if the policy is a Protected Policy and the machine is not Domain Joined or MDM managed. Policies are marked “Protected” if they are especially often abused by malware. For instance, policies controlling the content of the New Tab Page are protected because adware/malware commonly attempted to monetize users by silently changing their search engine and homepage when their “free” apps were installed on a user’s PC. Protected Policies are marked in the Edge documentation with the note:

This policy is available only on Windows instances that are joined to a Microsoft Active Directory domain, Windows 10 Pro or Enterprise instances that enrolled for device management, or macOS instances that are that are managed via MDM or joined to a domain via MCX.

When Edge detects that a device is in a managed state in which Protected Policies are allowed, it will show “Managed by your organization” at the bottom of the … menu

A Policy may also be ignored if the user is running in a Personal (MSA) Profile on an Enterprise client and the policy has been filtered as not applicable.

A Policy may also be ignored if there are conflicting policies between EMX/MAM and GP/MDM management tooling.

UPDATE: With the introduction of “Edge for Business” in version 116, some policies apply only to browser profiles signed in with organizational/enterprise accounts (e.g. eric@contoso.com) but not Microsoft Accounts (e.g. eric@hotmail.com). Each of Edge’s available policies has been annotated to note whether it applies to non-organizational accounts. For example, this policy will not be respected for a profile signed in with a personal Hotmail account:

The idea of this split is to better delineate between settings the enterprise is expected to have control over vs. those things that shouldn’t need to be controlled in an employee’s personal browsing. This was an … interesting … design choice.

Implementation mechanism

There’s no magic in how policies are implemented: while you should prefer using edge://policy to look at policies to get Edge’s own perspective about what policies are set, you can also view (and set) policies using the Windows Registry:

On Mac, the policies are stored in a .plist configuration file.

One important note: Chromium policy names are case-sensitive. If you write a policy to the registry yourself (rather than relying on the Group Policy editor or the like), you will see that the policy is not respected if you do not exactly match the case. For example, if you try to specify the URLBlocklist policy but write it as URLblocklist, you’ll see the following error inside the edge://policy page:

Careful, this thing is loaded…

You must take great care when configuring policies, as they are deliberately much more powerful than the options exposed to end-users. In particular, it is possible to set policies that will render the browser and the device it runs on vulnerable to attack from malicious websites.

Administrators should take great care when relaxing security restrictions through policy to avoid opening clients up to attack. For instance, avoid using entries like https://* in URLList permission controls– while such a rule may cover all of your Intranet Zone sites, it also includes any malicious site on the Internet using HTTPS.

… but Incomplete

Notably, not all settings in the browser can be controlled via policy. For instance, some of the web platform feature settings inside edge://settings/content can only be enabled/disabled entirely (instead of on a per-site basis), or may not be controllable by policy at all, only enabling end-user control.

In some cases, you may only be able to use a Master Preferences file to control the initial value for a setting, but the user may later change that value freely.

There’s a ton of great content about managing Edge in the Microsoft Edge Enterprise Documentation, including tables mapping Chrome and Edge Legacy policies to their Edge equivalents.

-Eric

Seamless Single Sign-On

There are many different authentication primitives built into browsers. The most common include Web Forms authentication, HTTP authentication, client certificate authentication, and the new WebAuthN standard. Numerous different authentication frameworks build atop these, and many enterprise websites support more than one scheme.

Each of the underlying authentication primitives has different characteristics: client certificate authentication is the most secure but is hard to broadly deploy, HTTP authentication works great for Intranets but poorly for most other scenarios, and Web Forms authentication gives the website the most UI flexibility but suffers from phishing risk and other problems. WebAuthN is the newest standard and is not yet supported by most sites.

Real World Authentication Flows

Many Enterprises will combine all of these schemes, using a flow something like:

  1. User navigates to https://app.corp.example
  2. The web application determines that the user is not logged in
  3. The user is redirected to https://login.corp.example
  4. The login provider checks to see whether the user has any cached authentication tokens, e.g. using the cookies accessible to the login provider.
  5. If not, the login provider tries to fetch https://clientcert.corp.example.com with a certificate filter specifying the internal CA root. If the user has a client certificate from the CA root, it is sent either silently or after a one-click prompt.
  6. If not, the login provider checks to see whether the user’s browser has any domain credentials using the HTTP Negotiate authentication scheme.
  7. If not, the login provider shows a traditional HTML form for login, ideally with a WebAuthN option that allows the user to use the new secure API rather than typing a password.
  8. After all of these steps, the user’s identity has been verified and is returned to the app.corp.example site.

In today’s post, I want to take a closer look at Step #6.

Silent HTTP Authentication

Unfortunately for our scenario, the HTTP Authentication scheme doesn’t support any sort of NoUI attribute, meaning that a server has no way to demand “Authenticate using the user’s domain credentials if and only if you can do so without prompting.”

WWW-Authenticate: Negotiate

And browsers’ HTTP Authentication prompts tend to be pretty ugly:

Depending upon client configuration and privacy mode, HTTP Authentication using the Negotiate (wrapping Kerberos/NTLM) or NTLM schemes may happen silently, or it may trigger the manual HTTP Authentication prompt.

So, at step #6, we’re stuck. If automatic HTTP authentication would’ve worked, it would be great– the user would be signed into the application with zero clicks and everything would be convenient and secure.

Load-Bearing Quirks

Fortunately for our scenario (unfortunately for understandability), there’s a magic trick that authentication flows can use to try HTTP authentication silently. As far as I can tell, it was never designed for this purpose, but it’s now used extensively.

To help prevent phishing attacks, modern browsers will prevent1 an HTTP authentication prompt from appearing if the HTTP/401 authentication response was for a cross-site image resource. The reasoning here is that many public platforms will embed images from arbitrary URLs, and an attacker might successfully phish users by posting on a message board an image reference that demands authentication. An unwary user might inadvertently supply their credentials for the message board to the third party site.

As noted in Chromium:

  if (resource_type == blink::mojom::ResourceType::kImage &&
      IsBannedCrossSiteAuth(request.get(), passed_extra_data.get())) {
    // Prevent third-party image content from prompting for login, as this
    // is often a scam to extract credentials for another domain from the
    // user. Only block image loads, as the attack applies largely to the
    // "src" property of the <img> tag. It is common for web properties to
    // allow untrusted values for <img src>; this is considered a fair thing
    // for an HTML sanitizer to do. Conversely, any HTML sanitizer that didn't
    // filter sources for <script>, <link>, <embed>, <object>, <iframe> tags
    // would be considered vulnerable in and of itself.
    request->do_not_prompt_for_login = true;
    request->load_flags |= net::LOAD_DO_NOT_USE_EMBEDDED_IDENTITY;
  }

So, now we have the basis of our magic trick.

We use a cross-site image resource (e.g. https://tryhttpauth.corp-intranet.com) into our login flow. If the image downloads successfully, we know the user’s browser has domain credentials and is willing to silently release them. If the image doesn’t download (because a HTTP/401 was returned and silently unanswered by the browser) then we know that we cannot use HTTP authentication and we must continue on to use the WebForms/WebAuthN authentication mechanism.

Update (Feb 2021): As of Chrome/Edge88, this magic trick will now fail if the user has configured their browser to “Block 3rd Party Cookies”, because the browser now treats a cross-origin authentication demand as if it were a cookie. Credentials for the cross-origin image will be omitted, and the browser will conclude that HTTP authentication is not available.

-Eric

1 Note that this magic trick is defeated if you enable the AllowCrossOriginAuthPrompt policy, because that policy permits the authentication prompt to be shown.

Post-Script: Prompting for Credentials vs. Approving for Release

As an aside, the HTTP Authentication prompt shown in this flow is more annoying than it strictly needs to be. What it’s usually really asking is “May I release your credentials to this site?“:

…but for implementation simplicity and historical reasons the prompt instead forces the user to retype their username and password.

Beating Private Mode Blockers with an Ephemeral Profile

Back in 2018, I explained how some websites use various tricks to detect that visitors are using Private Mode browsers and force such users to log-in. The most common reason that such sites do this is that they’ve implemented a “Your first five articles are free, then you have to pay” model, and cookies or similar storage are used to keep track of the user’s read count.

The New Yorker magazine is one such site:

Unfortunately, such “Private Mode blockers” make it hard for those of us who use Private Mode for other reasons (I don’t want to leave any traces of my Beanie Baby shopping research!). Private Mode detectors typically trigger for Chromium-based browsers’ Guest Profile that you might be use when borrowing a trusted friend’s computer.

So, what’s a privacy-conscious user to do?

If you’re using Firefox, you can use that browser’s “Containers” feature to isolate such sites into a partitioned container such that trackers from the site cannot follow you around the web.

If you use Microsoft Edge, you might consider creating your own “Ephemeral” browser profile for browsing sites that block InPrivate:

After you create the new profile, visit its Settings page at edge://settings/clearBrowsingDataOnClose and configure all storage areas to be cleared every time you close the browser1:

Note: Chrome does not offer a Clear on Close list, but does offer a limited Clear cookies and site data when you quit Chrome option.

You can then adjust any other settings you like, for instance, adjusting Tracking Protection to Strict in edge://settings/privacy or the like.

Then when you want to visit a site that blocks InPrivate, you can either open your Ephemeral profile from your profile icon, or use the Open link as command on a hyperlink’s context-menu:

In current versions of Edge, you can instruct the browser to automatically switch to your auto-erasing profile when navigating to a target site:

Over time, browsers will continue to work to make Private Mode detectors less reliable, but it’s unlikely that they’ll ever be perfect. Creating an ephemeral profile that clears everything on exit is a useful trick to combat sites which prioritize their business model needs over your privacy.

-Eric

1 In Edge 85 and earlier, you must unfortunately close all browser windows (even from your main profile) to trigger the cleanup of your ephemeral profile; closing just the windows from the ephemeral profile alone is not enough. This bug was recently fixed in Edge 86.

Advanced Q&A

Q: How is this Ephemeral/ClearOnExit Profile different than a regular InPrivate Mode session?

A: There are a few key differences.

  1. InPrivate tries not to write anything to disk (although the OS memory manager might at any time decide to swap process memory to the disk), while true profiles do not impose such a limitation. The “no disk write” behavior of Private Mode is the primary source of web-platform-observable differences in behavior that allow sites to build Private Mode detectors.
  2. By default, your default browser extensions do not load in InPrivate, but they can be configured to do so. In a different profile, you’ll have to install any desired extensions individually.
  3. By default, your credentials (usernames and passwords) do not autofill while InPrivate. In a different profile, your main profile’s credentials will not be available (and will be cleared on exit if configured to do so).
  4. InPrivate tabs do not perform Windows Integrated Authentication to Intranet sites automatically. Regular browser profiles do not have such a limitation.

Revealing Passwords

The Microsoft Edge browser, Edge Legacy, and Internet Explorer all offer a convenient mechanism for users to unmask their typing as they edit a password field:

Clicking the little eye icon disables the masking dots so that users can see the characters they’re typing:

This feature can be very useful for those of us who often mistype characters, and is especially important for users with various accessibility needs that can make error-free typing especially challenging. Keyboard users can hit ALT+F8 to toggle the reveal feature without using the mouse.

Nevertheless, Web Developers may disable this feature (for instance, if they offer their own version) by targeting the -ms-reveal pseudo element on an input type=password field:

.classNoReveal::-ms-reveal {
display: none;
}

If a site offers its own “reveal” feature, it should use CSS to hide the built-in feature to avoid confusing UI like this one:

Alternatively, sites may customize the Password Reveal Icon to better match their visual style.

Edge Legacy and Internet Explorer also respect a Windows policy (DisablePasswordReveal) that removes the password reveal button in various places throughout the system, including Edge Legacy and Internet Explorer. Some security configuration guides suggest setting this policy, arguing “Visible passwords may be seen by nearby persons, compromising them.” This is literally true; it is also true that such nearby persons might simply watch as the user’s fingers as they type in their password manually.

Notably, this Windows policy is not respected2 by Edge 79 and later, so we’ve had a few questions about that. I’d like to point out a few non-obvious characteristics of this feature that might assuage security concerns.

The most obvious attack that administrators are worried about is that a passerby might use this mechanism to steal auto-filled passwords from an unlocked, unattended computer. This concern is misplaced1: when the browser’s Password Manager autofills a password, the reveal icon is removed:

The PasswordInputType code is smart too– an attacker cannot get the icon to appear by simply adding or deleting a few characters, it only reappears after the user completely removes all of the characters in the input field. The icon is hidden if the field is modified by JavaScript, and it’s hidden if focus leaves the input field.

All of these protections mean that the Password Reveal icon is unlikely to be abusable in any meaningful way. Of course, typing passwords at all is an anti-pattern– use the Password Manager to mitigate phishing attacks, and eliminate the use of passwords wherever possible.

-Eric

1 Notably, while concern about the reveal button is misplaced, it’s entirely possible to steal your own password using the Developer Tools or by running JavaScript from the omnibox.

2 In Edge 87, we added an Edge-specific Group Policy to suppress the reveal button. You shouldn’t use it.